


Saion is the main accelerator-based cluster at OIST. We have a number of GPU-based and high core-count partitions useful for deep learning and other specialised tasks. The “test-“ and “intel” partitions are available for everyone with an account; apply to activate your account here. The regular partitions are restricted. Please apply for access here.
You log in to Saion with the “ssh” command. Please see our connection guide for details on setting it up for your own computer. To log in to Saion, run:
$ ssh your-oist-id@saion.oist.jp
This lands you in a login node. Here you can launch jobs, move data and prepare your work. Do not do any computation on the login nodes. To actually run a job you use Slurm through the “srun” and “sbatch” commands. For instance, to start a 2-hour long interactive job with four cores and one GPU on a test-gpu node, run:
$ srun -p test-gpu -t 0-2 -c 4 --mem=10G --gres=gpu:1 --pty bash -l
A batch script looks like this:
#!/bin/bash -l
SBATCH -p <partition>
SBATCH -t 0-1
SBATCH --mem=10G
...
Note the use of the “-l” option for bash above. This is necessary due
to the way the nodes have been set up. The option stands for “login” and
makes Bash read some configuration files on the nodes it would otherwise
skip.
All you need to know about using Slurm and about running jobs on the clusters is available on this page. You can find Saion partition-specific information (how to specify the GPU for instance) below.
Saion has a number of partitions. “test-gpu” and “intel” are open and available for anyone, and are meant for test jobs and short computations. See Open Saion Partitions.
The “gpu” and “largegpu” partitions are restricted systems for general computation. See Restricted Saion Partitions
“test-gpu” - 6 nodes with 4xP100 GPUs, 36 cores and 512GB memory. Available to all Saion users.
“intel” - 4 nodes with 40 cores and 128GB memory per user. Fast floating-point calculations. Gang scheduling, available to all Saion users.
“gpu-v100” and “gpu-p100” (formerly “gpu”) - 8 nodes with 4×P100, and 8 nodes with 4×V100. Nodes are Intel w. 36 cores, 512GB mem. Good for any GPU-accelerated applications.
“gpu-a100” (formerly “largegpu”) - 4 nodes with 8×A100 GPUs with 80G memory each. Nodes have AMD CPUs with 128 cores and 2TB memory. Used for memory-intensive deep learning applications.
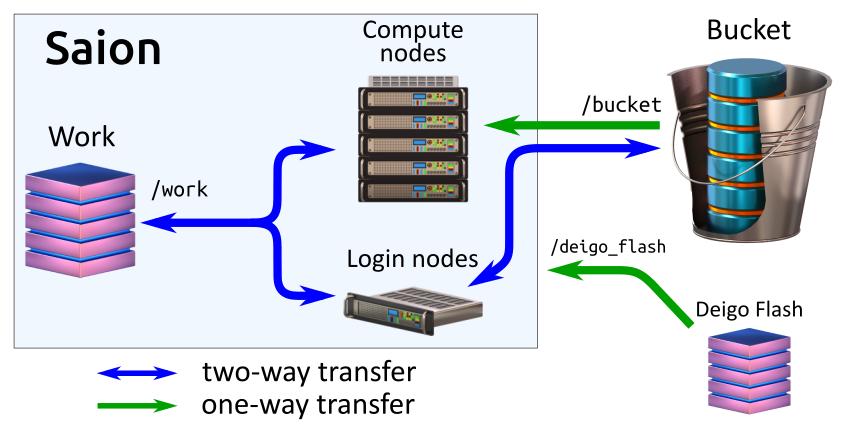 The Saion system. From the login nodes you can read and write to both Bucket
and work. From compute nodes you can only read from Bucket, but read and write
to Work. Deigo Flash is available read-only.
The Saion system. From the login nodes you can read and write to both Bucket
and work. From compute nodes you can only read from Bucket, but read and write
to Work. Deigo Flash is available read-only.
Work is the compute storage on Saion. It’s available as “/work”.
It is a 200TB SSD (solid state) storage system, and thus very
fast. The allocation is 10TB per unit, and this allocation is not
expandable. This system is meant only for storing data while you’re
running jobs; use Bucket for all long-term storage. Please see the
section “workflow” below for tips on how to handle this storage.
Bucket is mounted on the login nodes and read-only on compute nodes
as “/bucket”, just like on Deigo. You can use the same data sets in
the same way: Read your data directly from Bucket, use Work for
temporary files and output, then copy results back to Bucket and clean
up Work at the end of the computation. See the Bucket
page for
more.
Deigo Flash is the /flash file system on Deigo, accessible read-only as
/deigo_flash on Saion. You can run a job on Deigo CPU nodes and store the
output on /flash, then start another job on Saion with the data from the
Deigo job as input without having to copy anything yourself.
HPacquire is fast storage for data import. The HPacquire system is mounted as /hpaqcuire on Saion. It is a fast, temporary storage area for transferring data from scientific instruments and outside sources into our HPC systems. You can mount hpaquire on your personal laptop or workstation; a data collection system or on some other external data source, then copy the data to hpacquire.
On Saion, /hpacquire is available directly from the compute nodes, so you can use the data without having to copy it over to /work first. But HPacquire is read-only on the cluster side; you need to use /work to store any results, then copy it back to Bucket at the end. See the HPacquire manual for more on this system.
Home is the same as on Deigo. Please avoid storing any research data or perform computations from here. The system is quite slow and has a small 50G capacity per user.
All components are connected using 100GB infiniband EDR. This is a fast, low-latency network that should give you file access times similar to a local solid-state drive. Saion has two login nodes, and two administration nodes (for redundancy).
The operating system is Redhat-like Linux but the version varies by partition.
The Work storage system gives each unit 10TB of storage space. This is fast but the storage is limited, so you need to use the same workflow as on Deigo.
Keep your data on Bucket, where it is safe and backed-up. Read data directly from Bucket during your computations.
Use Work as temporary storage during your computation: log files, temporary files, output files and so on. You can create a subdirectory and keep all your temporary data there.
When you’re done, copy any files you want to keep back to Bucket. Finally clean up Work to free up space. If you created a temporary directory you can just delete the whole directory at once. Never keep data permanently on Work.
Start your job from your home directory. The Slurm output files get written to the starting directory. If you start from Bucket they can’t be written to, and the job will fail. If you start from /flash you need to remember to clean them up separately.
Alternatively, explicitly specify the absolute path to your Slurm output files with the “-o” parameter. We suggest you use a folder in your home for this.
We have a suggested Slurm script that you can use to automate the process. It creates a unique temporary directory, runs everything in there, copies the results back, then deletes the directory:
#!/bin/bash -l
#SBATCH -p gpu-p100
#SBATCH -t 0-1
#SBATCH --mem=20G

# create a temporary directory for this job and save the name
tempdir=$(mktemp -d /work/MyUnit/myprog.XXXXXX)

# enter the temporary directory
cd $tempdir

# run your code (we use "myprog" as an example here)
# and output to our temporary directory
myprog /bucket/MyUnit/mydata.dat -o output.dat

# copy our result back to Bucket. We use "scp" to copy the data
# back as bucket isn't writable directly from the compute nodes.
scp output.dat saion:/bucket/MyUnit/

# Clean up by removing our temporary directory
rm -r $tempdir
Create a temporary directory
You can use the “mktemp” command to create files or directories that are guaranteed to be unique. You don’t want to accidentally mix files for different jobs with each other. We save the directory name in a shell variable:
$ tmpdir=$(mktemp -d /work/MyUnit/tempdir.XXXXX)
$ cd $tmpdir
Now we’re in a temporary directory on Work. All output will end up here, and we can clean it up afterwards by deleting the directory.
copy back (stage out) your results
Bucket is read-only, so you can’t use “cp” to copy results back directly during a job. Instead, use “scp” to copy results back from a compute node or in a job script:
scp /work/myUnit/myresult.dat oist-username@saion:/bucket/myUnit/
Then remove all the original data on work:
$ rm -r $tmpdir
Now you’ve reclaimed the space on work and it’s ready to use for the next job and your other unit members.
Section: The open Saion partitions. Section: The restricted Saion partitions.