


Deigo is the main cluster here at OIST. It started operation in June 2020. It consists of compute servers from Dell Japan, and incorporates storage systems from DDN.
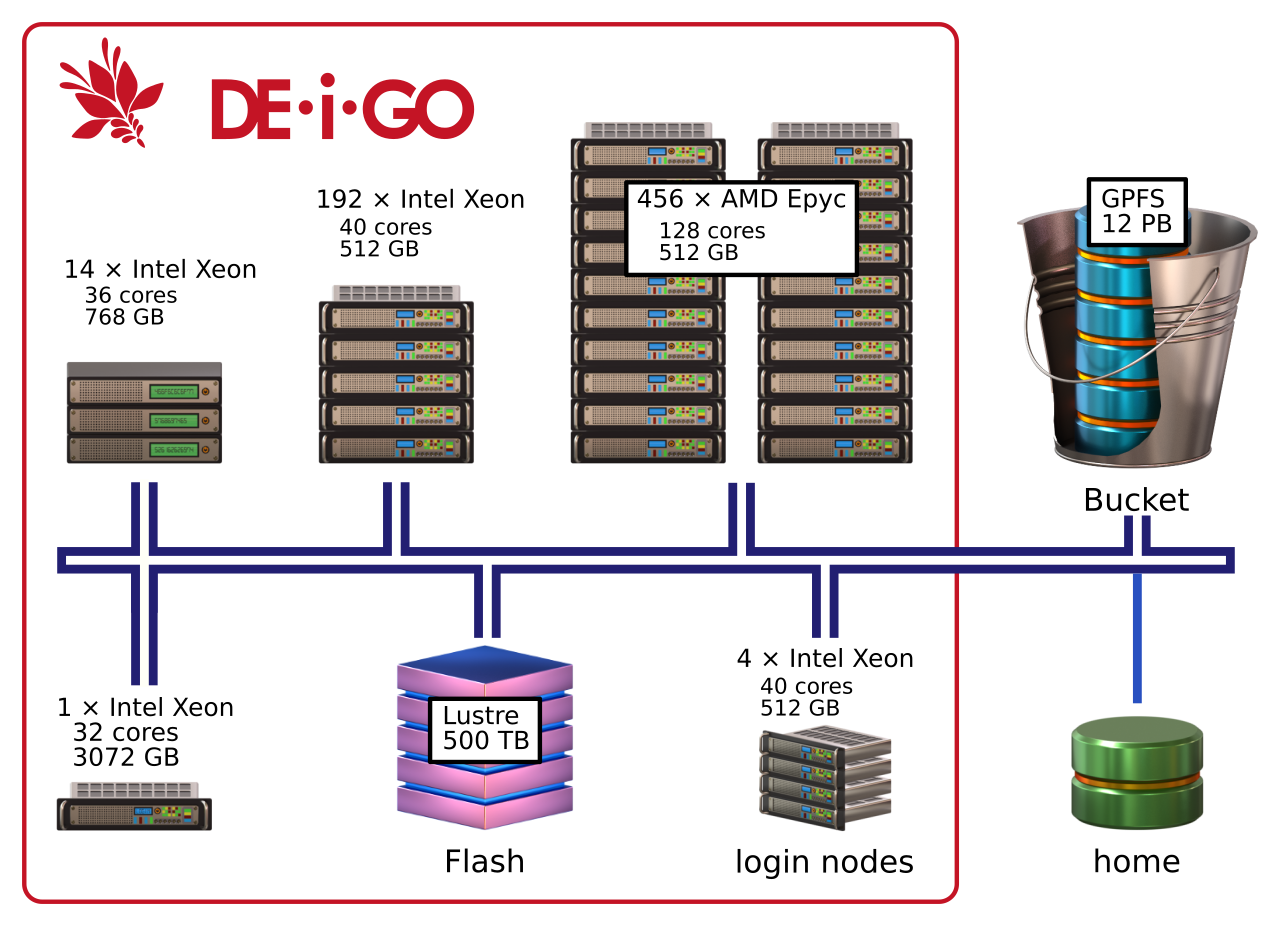
Deigo has two types of nodes, with CPUs from AMD and from Intel. The main AMD nodes each have 128 cores and 512GB memory. The secondary Intel nodes have 40 cores and 512GB memory. One partition also houses a small number of nodes with fewer cores and more memory.
| Nodes | CPU | Memory (per node) |
cores (total) |
|---|---|---|---|
| 456 | 2*64 core AMD Epyc 7702 @ 2.0GHz | 512GB | 58368 |
| 192 | 2*20 core Intel Xeon 6230 @ 2.1GHz | 512GB | 7680 |
| 14 | 2*18 core Intel Xeon 2680 @ 2.5Ghz | 768GB | 504 |
| 1 | 4*8 core Intel Xeon 4809 @ 2.0GHz | 3072GB | 32 |
| 1 | 2*12 core intel Xeon 2680 @ 3.3GHz | 1536GB | 24 |
| 663 | 339TB | 66608 |
Each node has local SSD storage and is running CentOS 8.5 with the 4.18 version of the Linux kernel.
For an overview of the OIST storage systems, see this page.

The working storage (called “Flash”) is a 500TB SSD Lustre system from DDN. It is a high-performance temporary storage system that you use when running jobs. Each research unit has a non-expandable 10TB allocation. Please move all data off Flash when you’re done using it for computing.
The main research storage at OIST, “Bucket”, is a 60PB GPFS storage
system from DDN. It is fully accessible from the Deigo login nodes as
/bucket, and available read-only from the compute nodes.
In addition, the Saion /work working storage is available read-only as
/saion_work from Deigo compute nodes.
All nodes and storage systems are connected with an Infiniband HDR network with 200Gb/s bandwidth and a node-node latency of 2-5µs. This network, in combination with the fast SSD flash storage, creates a distributed storage system that can perform similar to or better than that of node-local storage.
You can use the Datashare directory on the Deigo login nodes to quickly share data with other users on the system. See here for details.
The cluster is organised into partitions, groups of nodes used for a common purpose. Anybody at OIST can get access to the open partitions, while restricted partitions are only available for running specific workloads or applications.
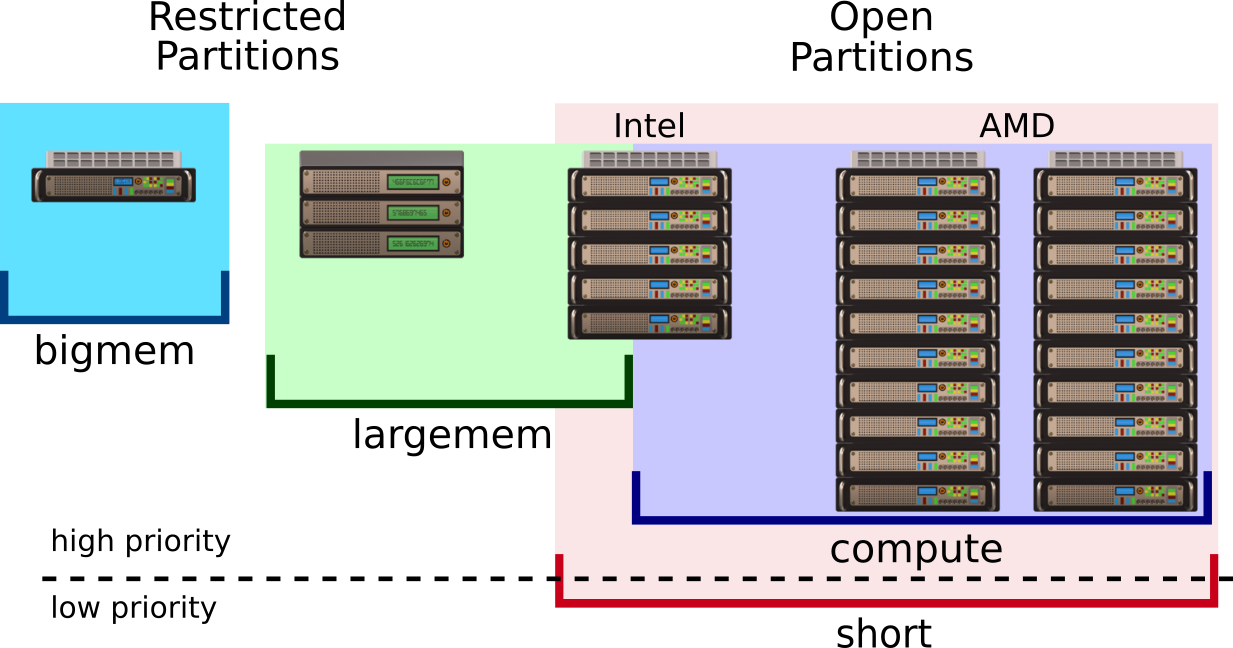
We have two open partitions on Deigo: “short” and “compute”. We have two restricted partitions: largemem” and “bigmem”. If you need more cores or more time, you can ask to change the allocation. More details on this page.
| Partition | Total cores | Cores per node |
Memory per node |
Memory per user |
Max cores per user |
Max time per job |
|---|---|---|---|---|---|---|
| short | 63072 | 36-128 | 500GB | 6500G | 4000 | 2h |
| compute | 44416 | 40-128 | 500GB | 7500G | 2000 | 4 days |
| largejob | 19200 | 128 | 500GB | —1 | —1 | —1 |
| largemem | 2264 | 36-40 | 500-750GB | —2 | —2 | —2 |
| bigmem | 56 | 32/24 | 3T/1.5T | — | — | — |
1: largejob allocations are decided by the SCC.
2: largemem limits you to ~5 nodes worth of resources in total.
These partitions are available for anybody at OIST, for any computing tasks. The application is very simple. You can apply here.
Note: The default memory setting is 4GB per core. You take more memory the more cores you ask for. Above 125 cores you would ty to get more memory than is available on the node. Always explicitly specify how much memory you need, per core or per node!
“compute” comprises most AMD nodes and many Intel nodes. This should be your default partition, and is meant for small and interactive jobs as well as for larger multi-node jobs and long-running jobs. The maximum number of cores per user is 2000, maximum memory per user is 7500G and the maximum running time is 4 days. You can submit up to 2016 jobs at once.
If you need more time, you can apply to exchange cores for time. See this page for more.
“short” is meant for very short batch or interactive jobs, and jobs that need a lot of cores. It comprises all nodes on Deigo except the larger Largemem nodes and Bigmem. The maximum number of cores per user is 4000, maximum memory per user is 6500G and the maximum time is 2 hours. You can submit a maximum of 4016 jobs at once.
If you need more time, you can apply to exchange cores for time. See this page for more.
job suspension
The short partition is low priority. It includes nodes in compute, largejob and largemem in addition to the Intel nodes. If the “short” partition is getting full and a job on “compute” or “largemem” doesn’t have enough free cores to run, Slurm will suspend a few jobs on “short” to make room. Once the job is finished, the suspended jobs will resume again.
Some applications may not be able to resume cleanly, and will crash. And an interactive job will freeze while suspended, and be useless. In practice we expect job suspensions to be rare. For the vast majority of jobs this sould never become an issue.
You also get access to the open partitions on the Saion cluster. This gives you access to GPU computation though the “test-gpu” partition and other resources. Please see this page for more.
These partitions are restricted, so you need to apply for them, and have a reason for access. Please apply for access here. Once you apply, we will ask you to come to the Open Hours (in room B648 between 15:30 and 17:30 every day, and online through Zoom: https://oist.zoom.us/j/593265965 ) to discuss the application in person.
Largemem is for jobs that need large amounts of memory and long running times. This is often used for bioinformatics, but other users sometimes make use of them as well. It consists of 58 nodes with 512-768GB memory each. See this page about large memory partitions for details.
Bigmem is two nodes with 3TB and 1.5TB of memory. This is a scarce resource, and access is granted sparingly. See this page about large memory partitions for more about this system.
Largejob is for jobs that can scale into thousands of cores. This partition is managed by the SCC (Scientific Computing Committee). If you would like to use it, please ask your unit leader to fill in this form on your behalf.
You log in to Deigo with the “ssh” command. Please see our connection guide for details on using ssh on your own computer. To log in, do (the “$” signifies that this is a command you type on the command line, you do not type it):
$ ssh oist-id@deigo.oist.jp
This logs you in to a login node. Here you can launch jobs (HPC jargon for running an application), move data and prepare your work. Don’t do any computation on the login nodes - you are sharing them with many others.
To run a job you use Slurm, through the “srun” and “sbatch” commands. You can read more about using Slurm in our guide here.
For instance, to start a 4-hour long interactive job with 10G memory and 8 cores on a compute node on the “short” partition, run:
$ srun -p compute -t 0-4 -c 8 --mem=10G --pty bash
Here “-p” selects the partition; “-t” sets the time (0 days and 4
hours); “-c” sets the number of cores; “--mem=” sets the amount of
memory per node; “--pty” says to make it interactive, and the program
is “bash” which gives you a new command line on the compute node.
A corresponding batch script looks like this:
#!/bin/bash
#SBATCH -p compute
#SBATCH -t 0-4
#SBATCH --mem=10G

<your commands here>
On the compute nodes, you have read-only access to Bucket (under “/bucket”),
and read and write access to Flash (under “/flash”). Flash is very fast but
space is limited (a total of 10TB per unit) and is not backed up. Bucket is
backed up and can expand to accomodate the needs of the unit. Always keep
important data on Bucket and nowhere else!
Keep all important data on Bucket. Data there is periodically backed up and can be restored in case of a disaster.
Read data directly from Bucket during your computations; don’t copy it over to Flash.
Use Flash for temporary storage during your computation: log files, output and so on. Ideally use a new unique directory for each job.
After your computation is done, copy the results and any other output files you might want to keep back to Bucket.
Finally clean up Flash so it’s free to use for the next job. If you created a temporary directory you can just delete the whole directory at once. Never keep data permanently on Flash.
Start your job from your home directory. The Slurm output files get written to
the starting directory. If you start from Bucket they can’t be written to, and
the job will fail. If you start from /flash you need to remember to clean them
up separately.
Alternatively, explicitly specify the absolute path to your Slurm output files
with the “-o” parameter. We suggest you use a folder in your home for this.
Here is a template for a batch script that does all of the above steps automatically:
#!/bin/bash
#SBATCH -p compute
#SBATCH -t 0-1
#SBATCH --mem=20G

# create a temporary directory for this job and save the name
tempdir=$(mktemp -d /flash/MyunitU/myprog.XXXXXX)

# enter the temporary directory
cd $tempdir

# Run your program, with input from bucket,
# and output to our temporary directory
myprog /bucket/MyunitU/mydata.dat -o output.dat

# copy our results back to Bucket. We use "scp" to copy the data
# back  as bucket isn't writable directly from the compute nodes.
scp output.dat deigo:/bucket/MyunitU/

# Clean up by removing our temporary directory
rm -r $tempdir
A few words of explanation: “mktemp -d” creates a directory with a
guaranteed unique name. It will replace the ‘XXXXXX’ with a random
string. “tempdir” will hold the name of the directory.
We use “scp” to copy results back to Bucket. As Bucket is read-only we
copy it over the network through “deigo”, which is one of the login
nodes.
A few types of computations involve running multiple applications, one after another, with very large intermediate data files. If these data files are large and numerous enough (and if multiple unit members are running simultaneously), the 10TB allocation on Flash may not be enough to store all of it at once.
The solution is to move temporary files to Bucket in between the computation steps. Create another temporary directory on Bucket, use it for temporary storage, then delete it as well to clean up at the end. Here’s an example script:
#!/bin/bash
#SBATCH -t 0-1
#SBATCH --mem=20G

# create a temporary directory for this job and save the name
tempdir=$(mktemp -d /flash/unitU/myprog.XXXXXX)

# create another temporary on Bucket
bucketdir=$(ssh deigo mktemp -d /bucket/MyunitU/myprog.XXXXXX)

# enter the temporary directory on Work
cd $tempdir

# Start 'myprog1' with input from bucket,
# and output to our temporary directory on /flash
myprog1 /bucket/unitU/mydata.dat -o output1.dat

# copy the output file to the bucket temporary,
# then delete it from flash:
scp output1.dat deigo:$bucketdir
rm output1.dat

# run the next pipeline step with output1 as input:
myprog2 $bucketdir/output1.dat -o output2.dat

# repeat as needed
...

# copy final results back, then delete the temporary directories:
scp output.dat deigo:/bucket/unitU/
rm -r $tempdir
ssh deigo rm -r $bucketdir
We can’t create or delete a directory on bucket directly as it is
read-only. Instead we use “ssh deigo <commands>” to run the commands
on a Deigo login node.
Deigo uses CentOS 8, and has all common libraries and tools installed by default. In addition we provide newer and more specialized compilers and other tools as modules. We recommend that you use the newest “gcc” compiler module and the “OpenBLAS.gcc” module for building software if you are unsure on what to use. If you use the Intel compiler, please use 2019_update5 or 2023.0; other versions either do not work on CentOS 8, or don’t work well on AMD.
Please see our page on building software and creating modules for more information.
On Deigo is that we have two separate types of machines: The intel nodes and the AMD nodes (the largemem and bigmem nodes are similar to AMD in this respect).
Software built on the Intel nodes might run faster on those nodes in some cases, but will crash on all other nodes on Deigo or Saion.
Software built on the AMD nodes will work well everywhere.
The login nodes are Intel nodes: if you build and install software on the login nodes it will only work on Intel nodes.
The takeaway:
Here an example of an interactive job for building software:
$ srun -t 0-4 -p compute -C epyc -c 16 --mem=16G --pty bash
This command will start a 4-hour job on the “compute” partition, with 16
cores and 16GB memory. The “-C epyc” option tells Slurm to select a
node with tag “epyc” — these are the AMD nodes. If you want to use
the Intel nodes, use “-C xeon” instead.