


Here we show some more complicated usage patterns for Slurm. While they’re more involved, they’re not very difficult to use, and they solve some common problems that you tend to encounter when you use a cluster. For our introduction to Slurm, see this page.
Also, more than a few of these make use of shell scripting in some way or another. We provide links to the relevant Bash shell documentation wherever we can. You can find our Introduction to Bash and our Advanced Bash pages in these links.
We will cover:
Slurm uses a lot of specific terms to describe the system. Let’s review some of them here:
jobs, job steps and allocations
A job is a request from you to Slurm for some resources - CPU cores and memory, a partition, maybe a GPU - for some amount of time, and some program to run. You’re giving Slurm a job to do. The resources you get are called an allocation.
All jobs have at least one job step that actually does something with
the resources. For a batch job, the first job step is the shell script
you gave it when you submitted the job. For an interactive job it’s the
command you gave to srun. For example, this is a job that asks for 1
core and 2G memory for one minute (that’s the allocation), and the job
step runs the “echo” command:
$ srun -p compute -t 1:00 -c 1 --mem=2G echo "hello world!"
You can have more than one job step, and you can allocate resources without having a job. We talk about that further below.
Task and process
A task and a process both refer to a single running program. A single task or process may use multiple cores (that’s called multithreading), but won’t run across nodes. A distributed application consists of multiple separate processes communicating with each other, often using the MPI library to do so.
What is the difference between “task” and “process”? For Slurm, a Slurm task is an allocation unit that Slurm keeps track of, while a process is an actual program running on a node. You tell Slurm to create a task, and Slurm in turn starts a process on a node, based on the parameters of the task. The task is what Slurm keeps track of, and the process is what the operating system actually runs.
These terms are often used interchangeably — you often see both “task” and “process” used for a running program — and the Slurm documentation isn’t even completely consistent with itself.
Work unit
We will sometimes use “work unit” in this document to refer to the actual script or program that you want to run. “Job” and “task” are often used for this in general, but as those have specific and different meanings for Slurm we felt they would be confusing. “Process” is, as we note above, a single program, but in practice you often run a script with multiple programs in a single work unit.
CPU
A Slurm cpu is the basic unit of computation that you allocate. This is usually the same as a CPU core. Older systems allocated resources by CPU, which is where the term comes from.
Here’s a collection of smaller things that are good to know about Slurm. Some of them are also mentioned elsewhere, and collected here for reference.
sbatch takes the same options as srunYou use sbatch to submit job scripts, and you set the parameters for
the job in the script. But you can also set parameters on the command
line with sbatch. These parameters override the parameters set in
the script itself.
This batch script asks for 8 cores:
#!/bin/bash
#SBATCH -c 8
...
But if we submit it like this:
$ sbatch -c 16 script.slurm
The job will now use 16 cores, not 8. This can be useful in several situations; we make use of it below when creating chain jobs for example.
sbatch without a scriptYou don’t need to write a script to use sbatch and run a batch job. Sometimes you want to run a single command as a one-time job. For instance, you might want to do a large file download to Bucket or copy files using the “datacp” partition.
In such a case, you put all job parameters on the command line, similar
to srun, and add your command with the --wrap option. Let’s say you
want to download the “Dfam” database to Bucket using the curl command:
$ sbatch -p datacp -t 1-0 --wrap 'curl -LO https://www.dfam.org/releases/Dfam_3.6/families/Dfam.h5.gz /bucket/MyunitU'
We ask for the datacp partition (where you can write to Bucket at high
speed), and for one day of runtime. We put our command in quotes after
the --wrap option. It’s called “wrap” because Slurm effectively wraps
your command in a script and runs that script for you.
When your job is finished, Slurm will tell you if your job succeeded or failed. Functions such as chain jobs and job emails make use of that to decide what to do. But what does it mean that a job failed? How does Slurm know?
All commands return an exit code. You can read about it in our advanced Bash guide here. Briefly, when you run any command it returns a value between 0 and 255. Usually 0 means success, and any other value means something went wrong.
So what is the return value of a script? It’s the return value of the last command the script ran.
If you have a script where you run a main command, then do a file copy command at the end, and your main command fails but the copy command works, your script will return success and Slurm will think your job worked. And if your main command worked fine but a later command didn’t - perhaps the copy command didn’t find all the files you specified - Slurm will think your job failed.
If you want to specify the exit value of your script, you can use the
exit command. It can take a value as an argument, so exit 0 will
make your script exit with a success return value, and exit 1 (or any
other non-zero value) will exit with a failed value.
If you want your return value to reflect that of your main command, you
can save the exit value stored in $?, then call exit with that value
at the end, like this:
# run the main computation
my_program

# "$?" holds the last return value
# we save it in exit_val
exit_val=$?

... other commands ...

# exit with our command exit value
exit $exit_val
You can of course also use the exit value to determine if your computation worked and exit early instead of running the rest of the script if it failed.
If you are using srun to run any kind of non-trivial command remotely,
you need to run them in a subshell. Take a look at these three examples:
# Ex 1: start interactive job, set jobname to "myjob"
$ srun -p compute -J myjob --pty bash

## We're in the job and we can get the job name in SLURM_JOB_NAME
$ echo $SLURM_JOB_NAME
myjob

## exit our interactive job
$ exit


# Ex 2: run the echo command directly, but now the output is empty
$ srun -p compute -J myjob echo $SLURM_JOB_NAME


# Ex 3: Run new bash instance in the job:
$ srun -p compute -J myjob bash -c 'echo $SLURM_JOB_NAME'
myjob
What’s going on? When we try to run the echo command directly, bash will
substitute “$SLURM_JOB_NAME”
with its value before running the srun command. It happens when we’re
still on the login node, with no job running and so it’s unset. But we need
the substitution to happen after srun has started, on the compute node
that srun gives us.
The solution is to run bash as the remote command, with the shell
command line as its argument. Note above that we enclose the command
with single quotes (´) not double quotes (“). With double quotes our
current shell on the login node still does the variable substitution before
our line runs.
We can use this for any shell command that we want to use remotely. A typical one would be a pipeline command, or a simple loop. We’ll see this issue down below when using Slurm environment variables.
Keeping track of quoting levels and things like that becomes a hassle when your command line is complicated. At some point it’s generally better to put your entire command into its own file and use it as a shell script that you call from the job instead.
If you are using an MPI library that hasn’t been built with support for Slurm, you may need to give it an explicit list of hostnames to use for the job.
The easiest way to generate such a list is to use the “scontrol show”
command. Here is an example of generating a “hostfile” with a list of
nodes, then use it to explicitly launch an MPI program:
#!/bin/bash
#SBATCH --nodes=4
...

# create a guaranteed unique temporary file
hostfile=$(mktemp)

# List nodes, one per line, and store in our hostfile
scontrol show hostnames >$hostfile

# use the mpirun "-hostfile" option
mpirun -hostfile $hostfile myMPIprogram
srun optionsHere a few useful options for srun, especially when using it to run job steps:
| Option | Description |
|---|---|
--exact |
When you run a job step, allocate only the resoruces you specify in the srun command. This leaves resources for a possible second parallel job step. |
--mem=0 |
In job steps, this means “share memory equally among all steps on each node”. You don’t have to manually have to calculate how much to give each step. |
-v |
With the “verbose” flag, srun will report exactly how it allocated resourses. Useful to make sure you’re running a job the way you think you are. |
You sometimes want to run many related jobs. For instance, you might want to run the same analysis on many input files, one per job. Or run a large set of simulations, each with a different parameter set. Slurm uses array jobs for this.
You create one job script, then let Slurm use that same script for
multiple jobs. The --array batch job option let’s you specify a
numerical range. Slurm submits one job with your script for each value
in the range. A shell variable
“SLURM_ARRAY_TASK_ID” will hold the current value for each job, and
you use that to determine what, exactly, each job should do.
Here is a short example, where we only print out the value for each job:
#!/bin/bash
#SBATCH --partition compute
#SBATCH --time 1:00
#SBATCH --mem=5G
#SBATCH --array=1-5

echo "this job is number " ${SLURM_ARRAY_TASK_ID}
This will create five output files, one per job, each with the text “this job is number N” where N will be from 1 to 5.
Each job will be completely independent. They each get the full resources you assign in the script: we set “–mem=5G” in the script, giving each of the five jobs 5G of memory.
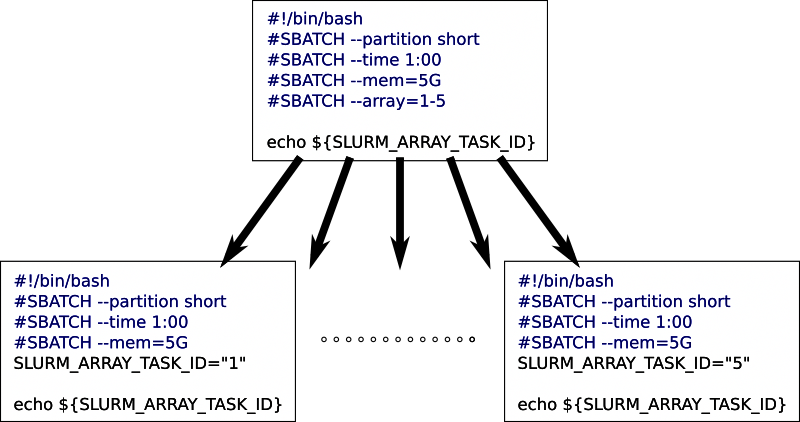
The only difference between the jobs is the value of
SLURM_ARRAY_TASK_ID. Other than that they are all identical. We will
describe further down how you can use this value to determine what each
job should be working on.
The minimum value in an array range is 0, and the maximum value is
39999. In addition, there are partition-specific limits on how many
jobs you can have; on Deigo compute you have a maximum of 2016 jobs at
any one time. See the section on a different approach to array
jobs for what to do if you need to run more jobs
than that.
You can specify the range in a number of ways:
--array=1-10 |
from 1 to 10 (1, 2, 3, 4, 5, 6, 7, 8, 9, 10) |
--array=1,4-6,10 |
1, 4 to 6, then 10 (1, 4, 5, 6, 10) |
--array=0-16:5 |
Every 5th value from 0 to 16 (0, 5, 10, 15) |
A minus sign indicates a range. Commas let you list individual values or ranges. A colon specifies the step size between each value in a range.
If you end the range with “%<number>” Slurm will launch at most
<number> jobs at one time. It’s usually a bad idea to launch many
hundreds or thousands of jobs at once; this way you can keep it down to
a reasonable amount. We normally recommend no more than a few hundred or
so. For eample:
--array=0-1999%100
This would submit 2000 jobs, numbered 0 to 1999, but never have more than 100 running at any one time.
Since you get multiple separate array jobs from a single job submission, you need to make sure each job produces a separate Slurm output file. You can specify the array job output file names with “%A” for the job ID, and “%a” for the array index. By default the output goes to “slurm_%A_%a.out”. You use these specifiers like this:
#!/bin/bash
#SBATCH --output=myjob_%A_%a.out
...
Email alerts
that you set with “--mail-user” and “--mail-type” work on the entire
array job, not for individual jobs.
If you specify “START” and “END” for “--mail-type”, you will get an
email alert when the first array job starts and when the last array job
finishes, not an alert for the start and end of each array job.
You use the SLURM_ARRAY_TASK_ID shell variable value to
select your input file, or your parameters. But how do you actually do
that? There’s several ways.
The simplest way is to use the array index to construct a file name directly. Let’s say we have a list of file names like this:
$ ls *.data
input_1.data
input_2.data
input_3.data
input_4.data
...
We can use SLURM_ARRAY_TASK_ID to select which file each array job
should read:
myprog input_${SLURM_ARRAY_TASK_ID}.data
myprog is a stand-in for whatever application you want to
run. If SLURM_ARRAY_TASK_ID is ‘3’, for
example,”${SLURM_ARRAY_TASK_ID}” would be replaced by its value
“3” and the resulting command line for that job would become:
myprog input_3.data
If your file names aren’t already organized like this, it may still be easiest to rename your files so they differ only by a number, then set the array parameter so it covers the range of files you have.
If your inputs are not a simple number sequence like above, you can
create a bash array with your input values (see Bash Arrays in our
Advanced Bash guide), then
use SLURM_ARRAY_TASK_ID to select the right element from that array.
This is good when your file names don’t have a simple pattern, or if you
want to select between different parameters directly:
# this is a bash array, with elements separated by spaces
params=( element_a element_b 'element with spaces' )

# We index into the 'params' array using SLURM_ARRAY_TASK_ID
echo “list: “ ${params[${SLURM_ARRAY_TASK_ID}]}
On the first line we define a shell array called ‘params’ with a list of values. It’s delimited by a pair of simple parentheses. You can’t have any spaces between the variable name, the equals sign and the parenthesis.
Each element in the array is a string separated by a space. If we want to add a string value with spaces in it, we need to enclose it in quotes. The array values could be file names, simulation parameters or anything else you need for your job.
On the second line we use SLURM_ARRAY_TASK_ID to select the right
element in our array. This looks complicated, so let’s take it apart:
${SLURM_ARRAY_TASK_ID} is the index of the current array process.
params[index] is the array element at index (Bash arrays start with
0).
So params[${SLURM_ARRAY_TASK_ID}] is the array element corresponding
to the current SLURM_ARRAY_TASK_ID value.
And finally ${params[${SLURM_ARRAY_TASK_ID}]} substitutes that array
element with its value.
It looks messy with all those curly braces, but it’s really no different from indexing into an array in Python or Matlab.
⏺ Match a list of file names
If you want to use a list of file names with a common suffix or other simple pattern, you can let Bash fill in the list directly into the array:
bamfiles=(./*bam)
echo “BAM file: “ ${bamfiles[${SLURM_ARRAY_TASK_ID}]}
In the first line, ./*bam matches all files in the current directory
that end with “bam”. Bash recognizes that we’re trying to find a set of
file names — if you wanted the literal string “./*bam” as an array
element you would need to enclose it in quotes. bamfiles=(./*bam)
creates an array called ‘bamfiles’ with the matching filenames as
elements.
The only tricky part with this pattern is that you need to know the
number of files beforehand and set --array to a matching range. You can
look further below for a way to do this automatically.
⏺ Read file names or parameters from a file
Bash has a function called “mapfile” that can read lines from a file
and put directly into an array for you (see this
section in our Bash guide).
Let’s say you have a list of filenames in “files.txt”:
$ cat files.txt
weird_name.fasta
other_name.txt
third_file.data
my_picture.png
...
mapfile reads standard input and puts the lines into an array. We
can get our file names into an array “myfiles” like this:
# each line in "files.txt" becomes an element in array "myfiles"
$ mapfile -t <files.txt myfiles
$ echo ${myfiles[1]}
other_name.txt
The “-t” option removes the trailing newline from each file name. You
can now index this array of file names using SLURM_ARRAY_TASK_ID.
⏺ Generate an array of numerical parameter values
Let’s say you need parameter values that range from 0.5 to 1.0 with a
step of 0.05. You can generate an array with these values using the
seq command, and capture the output into
an array:
# generate a sequence with seq, capture the output with $( ...), then assign
# that output as an array to myarr with myarr=( ... )
$ myarr=( $(seq 0.5 0.05 1.0))

# print all myarr values
$ echo ${myarr[@]}
0.50 0.55 0.60 0.65 0.70 0.75 0.80 0.85 0.90 0.95 1.00
seq takes up to three values: the starting value, the step size and
the ending value. With two values it assumes the step size is 1 and with
just one value it also assumes you start at 1. If all values are
integers it generates integer values, but if one or more is decimal it
generates decimal values.
In an array job script it might look like this:
#SBATCH --array=0-11

# generate an array
myarr=( $(seq 0.5 0.05 1.0))

# run "myprog" with one of the values as a parameter
myprog ${myarr[$SLURM_TASK_ARRAY_ID]}
⏺ Use SLURM_ARRAY_TASK_ID to index 2d values
What if you want pairs of values that, say, represent points on a plane, or two different simulation parameters. You want to go through all combinations of the two values. That is easy enough to generate right in the script.
We create two arrays that contain the two value ranges. The number of possible combinations is the product of the size of each array, so we let the array go from 0 to that product.
#SBATCH --array=0-14

# five values in a_arr, three values in b_arr
a_arr=( $(seq 0 4))
b_arr=( $(seq 0 2))

# calculate indexes for the two arrays
a_idx=$(($SLURM_ARRAY_TASK_ID/3))
b_idx=$(($SLURM_ARRAY_TASK_ID-$a_idx*3))

# get the values for those indexes
a_val=${a_arr[$a_idx]}
b_val=${b_arr[$b_idx]}
a_arr has 5 values from 0 to 4 and b_arr has 3 values 0,1, and 2. We
create 15 array jobs (a_arr * b_arr = 15 combinations) from 0-14.
We use integer division to get the divisor orf the current array index
and 3 (the number of elements in b_arr) as a_idx. We set b_idx as
the remainder. Now a_idx will be [0, 0, 0, 1, 1, 1, 2, ...] and
b_idx will be [0, 1, 2, 0, 1, 2, ...] as the array index increases.

If you’re writing your own code, a third way to use array jobs is to
pass the SLURM_ARRAY_TASK_ID value directly to your program and let it
figure out what it should do in each case. With a simulation, for
example, it’s probably easier to generate the appropriate simulation
parameters directly in your simulation code rather than do it in the
Bash Slurm script.
Exactly how you do this will differ by the language you use. Below we show how to do it for Python.
In your slurm script, you give your python program the value as a parameter to your program:
myprog.py ${SLURM_ARRAY_TASK_ID}
And in your Python code you read the value and convert it to an integer:
# the sys module can give us the list of parameters
import sys

# parameters are stored in the sys.argv list as strings, so we convert
# to an integer. argv[0] is the name of our program, argv[1] is the
# first parameter and so on.
jobindex = int(sys.argv[1])
Now jobindex has the integer value of SLURM_ARRAY_TASK_ID. Most
languages have a similar way to get the parameter value.
If you have many jobs that are really short (less than 5 minutes) or a large number of jobs, it’s a very good idea to run more than one of them, one after another, in a single job. Each job takes longer, but you need fewer total jobs. This lets you get around the total job limit, and it’s more efficient since you spend less time waiting for jobs to start and finish.

At the top of the picture above we have five jobs (green) at the top, each doing one work unit and running one after another, each one with its own startup and shutdown time (yellow). At the bottom we have a single job running all five work units one after another, with no shutdown or startup time in between. The total running time is now significantly shorter.
How do we achieve this? Let’s take a simple example of an array job that runs a single task (we call our example program ‘myjob’):
#SBATCH --array=0-999

myjob ${SLURM_ARRAY_TASK_ID}
This will run ‘myjob’ 1000 times, each one in a separate array job. Let’s say ‘myjob’ takes 2 minutes. That’s really very short, and will mean we spend a lot of our time starting and stopping the jobs, not actually running ‘myjob’. We’d like to run at least four ‘myjob’ instances per job, one after another. Each job will now take 8 minutes rather than 2, but we will only need 250 array jobs instead of 1000, and they will finish faster overall.
The easy and obvious way is to run one job for every four values, have
each job run four work units, and add an
offset to
SLURM_ARRAY_TASK_ID:
#SBATCH --array=0-999:4

myjob $(( SLURM_ARRAY_TASK_ID ))
myjob $(( SLURM_ARRAY_TASK_ID + 1 ))
myjob $(( SLURM_ARRAY_TASK_ID + 2 ))
myjob $(( SLURM_ARRAY_TASK_ID + 3 ))
The “:4” part of the array setting tells slurm to only use every 4 values for the array: [0, 4, 8, 12 …]. The four ‘myjob’ lines run ‘myjob’ on that array value and the three following ones.
It’s not very elegant to run your command four times in a row. What if you want to do twenty really short operations, not just four? And what if it’s not a single command but a whole script? You don’t want to copy and paste dozens of lines several times. It would be ugly and really prone to errors.
Better to put the actual command into a loop:
#SBATCH --array=0-999:4

for i in {0..3}
do
    myjob $(( SLURM_ARRAY_TASK_ID + i ))
done
A problem with this is that it can be difficult to get the array limits right. In this case everything lines up nicely as 1000 (0-999) values is evenly divisible by 4, so 999 div 4 + 3 == 999.
But for other values it won’t. If your range is 0-1000 — that is, 1001 values — your highest value ends up being 1003. You need to add some kind of check to avoid calculating values you don’t want. You can add an if-statement that only runs the command when the value is not larger than the largest array value:
#SBATCH --array=0-1000:4

for i in {0..3}
do
    index=$(( SLURM_ARRAY_TASK_ID + i ))
    if [ "$index" -le "$SLURM_ARRAY_TASK_MAX" ]
    then
        myjob $index
    fi
done
SLURM_ARRAY_TASK_MAX contains the largest value that the array jobs
will take. We compare it to the index, and only run the command if the
index is less than or equal to SLURM_ARRAY_TASK_MAX.
Doing a set number of work units in each array job as above works. However, that approach still has a couple of problems. The main one is that you still have to determine ahead of time exactly how many arrays jobs to use, based on the amount of work you have. And you can’t make that a parameter of the script - you have to manually edit it every time.
Also, Slurm limits the max array value to 40000; and you are restricted from submitting more than a certain number of array jobs - about 2000 for the compute partition on Deigo. So you’re limited to no more than 2000 array jobs, and the array job value can’t go over 40000. What do you do if you have hundreds of thousands of small jobs?
A different approach is to completely separate the number of array jobs from the number of work units that you have. You fix the number of jobs, then calculate in the script how many, and which, work units each job should run.
Now you don’t have to figure out how many work units you have beforehand, and you don’t need to edit your script to take it into account. You can reuse the same script for different number of work units - different number of input files, for instance - without having to change anything. And it will work fine even if the total number is far larger than the Slurm limits.
You only need to be careful that you don’t run it with fewer work units than you assign array jobs. If you do, some jobs will run empty, which will waste some time and is not good for Slurm.
Here is a template for this idea:
#SBATCH --array=0-9

# the number of work items we have, from 0-34
N_WORK=35

# Calculate what work units each array task will process
# quotient and remainder of jobs to processes
quot=$((N_WORK/SLURM_ARRAY_TASK_COUNT))
rem=$((N_WORK-quot*SLURM_ARRAY_TASK_COUNT))

# the first "rem" tasks get one extra iteration
if [ "$SLURM_ARRAY_TASK_ID" -lt "$rem" ]
then
    step=$(( quot+1 ))
    step_min=$(( step*SLURM_ARRAY_TASK_ID ))
else
    step=$quot
    step_min=$(( step*SLURM_ARRAY_TASK_ID + rem ))
fi
step_max=$(( step_min+step-1 ))

# "step_min" is the first work unit we process, and "step_max" is the last
# Loop through all steps from step_min to step_max, and do one unit of
# work each iteration.
for i in $(seq $step_min $step_max)
do
    # Here you do your work. Use ""i" instead of "SLURM_ARRAY_TASK_ID"
    myjob ${i}
done
The double parentheses “$(( ... ))” is a way to do math in
bash; see that link
for details.
We divide the number of work units among the available array jobs as
evenly as possible. The quotient quot of the number of work units and
array jobs tell us how many work units divide evenly into the array
jobs. The remainder rem tells us how many are “left over”, so we add
one more job to the first rem array jobs. step is the number of work
units for each array job.
Then we use step to calculate step_min and step_max, the first and
last work unit for that particular array job. Finally we loop through
that range
(using the seq command to generate the sequence).
In this case we run all the work units “myjob” one after another. If
each work unit takes a longer time (more than 20 minutes or so) we could
instead run them in parallel - see the section on job steps
below for more on that.
Sometimes you want to start a job only after an earlier job finishes. Slurm lets you set this up automatically. This is called “chain jobs”.
For instance, you might have a set of jobs that analyse data, then start a final job that collates and plots the results. Or you have a pipeline where you run one task on CPUs, then another task on a GPU, then another on CPUs again. Each job should only start once the previous one has finished.
To tell Slurm to start a job after another job you use the
--dependency option.
You give Slurm a job ID (or list of job IDs) that you want to wait for before the current job will run. You also specify what condition you want to wait for.
You specify a chain job like this:
--dependency=<condition>:jobid:jobid:...
where <condition> specifies the condition for your job to run, and
jobid is a list of job IDs the job is waiting for. With multiple IDs
you separate them with a colon “:”.
As an example, let’s look at the “afterany” dependency condition. It
lets you start a job after an earlier job has finished in some way
(“any” means they finished in “any” way, failed or not). Let’s say we
have two job scripts job1.slurm and job2.slurm. What they do doesn’t
really matter; but let’s say that they look like
this, with job1.slurm:
#!/bin/bash
#SBATCH -t 5:00
#SBATCH -p short

echo -n "job1 started: "
date

# just sit and wait for 60 seconds
sleep 60

echo -n "job1 stopped: "
date
And job2.slurm:
#!/bin/bash
#SBATCH -t 5:00
#SBATCH -p short

echo -n "job2 started and stopped: "
date
We start job1:
$ sbatch job1.slurm
Submitted batch job 14107426
Then start job2, but asking that it starts only after job1 has finished:
$ sbatch --dependency=afterany:14107426 job2.slurm
Submitted batch job 14107433
We used the job1 job ID (“14107426”) as a parameter for the job2
dependency option. The “afterany” dependency means to wait until all the
jobs in the the list of jobs have finished for “any” reason, so job2
should be waiting for job1 to finish.
Here we used the --dependency option on the sbatch command line. We
could have added it right in the job2.slurm script, with a line such
as #SBATCH --dependency=afterany:1410726 but then we’d have to open
the file in an editor to set the right job ID. It’s easier to give the
option on the command line instead.
If we check with “squeue”, we can see that job2 is indeed waiting with reason “Dependency”:
$ squeue
     JOBID PARTITION       NAME     USER ST       TIME  NODES NODELIST(REASON)
  14107433   compute job2.slurm jan-more PD       0:00      1 (Dependency)
  14107426   compute job1.slurm jan-more  R       0:32      1 deigo011104
If we start two jobs with two different running times, then depend on both of them, our job will wait for both to finish before it runs. Let’s have one job that waits for 1 minute, and a second one that waits for 3 minutes. Start the two jobs, then list both job IDs in your dependency option, separated by colons:
$ sbatch job-1minute.slurm
Submitted batch job 14107566
$ sbatch job-3minutes.slurm
Submitted batch job 14107567

$ sbatch --dependency=afterany:14107566:14107567 job2.slurm
Submitted batch job 14107573

$ squeue
     JOBID PARTITION       NAME     USER ST       TIME  NODES NODELIST(REASON)
  14107573   compute job2.slurm jan-more PD       0:00      1 (Dependency)
  14107567   compute job-3minut jan-more  R       0:14      1 deigo011124
  14107566   compute job-1minut jan-more  R       0:16      1 deigo011104

...
$ squeue
     JOBID PARTITION       NAME     USER ST       TIME  NODES NODELIST(REASON)
  14107573   compute job2.slurm jan-more PD       0:00      1 (Dependency)
  14107567   compute job-3minut jan-more  R       1:30      1 deigo011124
As you can see, job2 is still waiting even though job-1minute has finished, because job-3minutes is still running.
Note that the “any” in “afterany” refers to the way the jobs finished — we start whether they failed or succeeded — not that we start after any of them have finished. As we’ll see below you also have conditions “afterok” and “afternotok” that run only when the first job was successful or not, respectively.
Usually you want to submit a chain job the same way every time. Doing it manually is inconvenient and error-prone. How do you submit a chain job automatically when you don’t know the job ID beforehand?
Here is a quick example of how you can do this. We create a small bash script that submits your first job, captures the job ID, then submits the second job that waits for the first job using that job ID.
As above, we use job1.slurm as our first job, then job2.slurm as the
second job that will wait for job1 to finish. We’ll use “parameter
expansion”
as described in our Advanced
Bash page to get the job ID.
We create a bash script like this:
#!/bin/bash

# first, we submit the original job, and capture the output.
# Slurm prints "submitted batch job <jobid>" when we submit a job.
# We store that output in jobstring using $( ... )

jobstring=$(sbatch j1.slurm)

# The last word in jobstring is the job ID. There are several ways to get it,
# but the shortest is with parameter expansion: ${jobstring##* }
# It removes everything up to the last space, leaving only the job ID

jobid=${jobstring##* }

# Now submit j2.slurm as a dependant job to j1:

sbatch --dependency=afterany:${jobid} j2.slurm
A brief explanation of how this works (see this section for more detail):
jobstring=$( .... ) runs whatever shell command is inside the
parentheses, and captures the output that would have been printed on
screen. That output is assigned to jobstring. So if sbatch would
have printed “submitted batch job 12345”, that text is now stored in
jobstring instead.
${jobstring} would expand into whatever is stored in jobstring. When
we say ${jobstring##* }, the ## operator after the variable name
takes the string in the variable on the left, and a pattern on the
right. It tries to find the longest string starting from the left that
matches the pattern, and removes it. The end result is whatever is left.
Our pattern is “* ”, or “anything at all that ends with a space”.
The last space from the left is the space before the jobid (there is
no space after). Everything up to and including that space is deleted,
and we end up with just the jobid value.
As an aside, we could be completely explicit and use this pattern instead:
${jobstring##Submitted batch job }
We explicitly match the literal string up to the start of the jobid.
## removes all that and leaves us with only the jobid itself. Also,
the Advanced Bash page has
at least two other completely different ways to extract the job ID.
Which one you use is ultimately a matter of taste and preference.
Finally we use our extracted Job ID as the parameter for our chain job dependency option when we submit the second job.
We saw above that afterany holds your job until all job IDs in the
list are terminated, whether they succeeded or failed. There are a
number of other dependency types:
| Dependency type | What it does |
|---|---|
| after | Start after the jobids have started or are cancelled and removed from the queue. You can optionally give a time like jobid+time where it will start time minutes after jobid started. |
| afterany | Start when all the jobids have stopped, whether they succeeded or failed. |
| afterok | Start if all the jobs started and successfully finished. That is, if all of their exit codes were zero. |
| afternotok | Start if the jobs all started but at least one job failed in some way: their exit code is not zero, the node failed or there was some other problem. |
| aftercorr | This matches array jobs with array jobs. When one job in an array job successfully ends, the corresponding array job in the dependent job will start. |
| singleton | The job will only start if no other job with the same job name and user is running. In other words, you can only have a single job with this name running at any one time. |
These are like afterany, except they only start if the original jobs finished successfully or unsuccessfully.
afterok will only run if all jobs finished successfully. If a single job in the list failed it will never run.
afternotok will run if even a single job failed. If they all finished successfully it will never run.
If the job never runs it will remain in the Slurm queue with status
“DependencyNeverSatisfied”. You need to manually remove it, or use the
--kill-on-invalid-dep=yes option to have Slurm kill the job.
With aftercorr you start two array jobs with the same array
parameter. Each job in the second array job will start once the
corresponding job in the first array job has finished successfully.
Here is a quick example of using aftercorr. Here’s the first array
job:
#!/bin/bash
#SBATCH -p compute
#SBATCH -t 10:00
#SBATCH --array=0-4

sleep ${SLURM_ARRAY_TASK_ID}0

echo "array 1:" $(date +%T)
We start an array job with 5 individual jobs, from 0-4. Each job sleeps from 0 to 40 seconds, then prints out the time it finished.
Here is our second array job:
#!/bin/bash
#SBATCH -p compute
#SBATCH -t 10:00
#SBATCH --array=0-4

echo "array 2:" $(date +%T)
Each individual job here will just print the current time and exit.
We start these with this script (you could do this on the command line too):
#!/bin/bash

jobstr=$(sbatch array1.slurm)
sbatch --dependency=aftercorr:${jobstr##* } array2.slurm
We start array1, and get the output (with the job ID) in jobstr. We
then start array2 as an array dependency to the first job.
${jobstr##* } gets replaced with the last word in ´jobstr´, which is
the job ID (we described this technique earlier in this section).
If the first and second array job indexes don’t match up odd things will happen. Please avoid that.
“singleton” jobs are a bit special. A singleton job will never run when
another job with the same job name and user is already running. If you
submit, say, 5 jobs all with the same job name and the singleton
dependency, they will run one at a time, with the rest waiting for their
turn.
The order they start tends to be in the order they were submitted. However, this order is not guaranteed by Slurm, and can change at any time. Don’t rely on the order they run.
Here we will describe what a “job step” is; exactly how srun works;
and what the salloc command does.
Caution: The details of how srun works depends quite a bit on the specific settings for Slurm. Below we describe how this all works on the Deigo and Saion clusters here at OIST; you may find that things work a little differently on other clusters.
When you start a job you’re doing two separate things. First you allocate resources for a job. Then you use some or all of those resources to actually run a program. That collection of Slurm-managed resources is an allocation; the allocation plus an application to run is a task; and the corresponding running program on a node is a process.
When you run “sbatch” it allocates the resources you ask for. It then
starts your script as the first task of the first node that got
allocated. This is also the first job step. Any processes you run
directly in that script is part of that same task. That task can make
use of the resources (cores and memory) on that first node. If you’re
only asking for a single task (using -n or --ntasks) then that’s all
you need to know.
But when you ask for multiple tasks, perhaps on multiple nodes, you need a way to start more tasks and and make use of the resources on other nodes.
You do this with srun. Let’s run just a simple command on all tasks of
a job:
#!/bin/bash
#SBATCH -p compute
#SBATCH -t 10:00
#SBATCH -n 4

srun -l hostname
We create a job with 4 tasks. Slurm starts our script as the single task
of the first job step. srun then starts four tasks, that each run the
command “hostname” (as a process), that prints the name of the current
node. The “-l” option to srun stands for “label” and prints out the
task number before each line of output — it’s completely optional but
sometimes very useful. The output is something like:
3: deigo012935.oist.jp
0: deigo012935.oist.jp
2: deigo012935.oist.jp
1: deigo012935.oist.jp
As you can see, they all ran on the same node, though that will not always be true.
The four srun tasks above is a job step. We have a job — an
allocation of resources — and then start job steps inside it. The bash
script itself is the first step, typically called “batch”. Let’s start
two job steps, one after another, with srun:
#!/bin/bash
#SBATCH -p compute
#SBATCH -t 10:00
#SBATCH -n 4

srun -l hostname
srun -l sleep 1
This prints the hostname as before, then runs the sleep command that
waits for one second.
We can see information about running and recent jobs with the sacct
command:
$ sacct
JobID           JobName  Partition    Account  AllocCPUS      State ExitCode
------------ ---------- ---------- ---------- ---------- ---------- --------
...
19282888     srun.slurm    compute  scicomsec          4  COMPLETED      0:0
19282888.ba+      batch             scicomsec          4  COMPLETED      0:0
19282888.ex+     extern             scicomsec          4  COMPLETED      0:0
19282888.0     hostname             scicomsec          4  COMPLETED      0:0
19282888.1        sleep             scicomsec          4  COMPLETED      0:0
Here we see that our simple job is tracked as five separate items. The first line named “srun.slurm” is the overall job. The second job is the “batch” job step (the full JobID is 19282888.batch). That’s our shell script; any resources we use directly in the script is tracked in this step. The third step is “extern”, and it mainly tracks resources used by slurm for starting and stopping the job. You can ignore that.
The last two lines are our two srun commands. They create job steps counting from 0, with the job name set to that of the command they run by default. The resources they use - time, memory, cpu - are tracked separately for each step.
You normally don’t need to worry about job steps directly, but since Slurm often presents information related to job steps it’s good to know about them.
srun, Slurm environment variables and shell commandsWith srun we can run a number of tasks in a job step as we saw above. What if we want to do something different in each task - perhaps the program we start should do a different thing or read a different input depending on the task. Slurm defines a set of environment variables that give you things such as the task number, the step number and so on:
| Slurm environment variable | meaning |
|---|---|
| SLURM_STEPID | The job step number starts at #0 for srun, unset for the bash script) |
| SLURM_PROCID | The process (starts at #0 across all tasks on all nodes) |
| SLURM_LOCALID | The local process on this node (starts at #0 on each node) |
| SLURM_NODEID | The node (starts at #0) |
You might think we can use these variables directly, like this:
srun -l echo $SLURM_PROCID
If you try this, you will see that it doesn’t work:
3: 0
1: 0
0: 0
2: 0
Why? $SLURM_PROCID is read and substituted by the bash script itself
before srun starts the job step - we saw this issue
above. Our local shell will substitute the variable with
its value before srun even starts. When you want to use shell features
in a job step, you need to explicitly start a new shell for each task,
then run your commands inside that shell:
srun -l bash -c 'echo $SLURM_PROCID'
srun bash starts a new bash shell. You give bash the commands to run
with the -c option. You need to put single quotes (‘ … ‘) around the
commands so that the parent shell doesn’t try to read the environment
variable. Now it works properly:
3: 3
1: 1
0: 0
2: 2
In our next section you can see how to use this to run multiple work units at once.
Alternatively you can put the shell commands in a file, then run the file as another script. This can often be easier than trying to handle multiple levels of shell quotes:
srun -l bash mycommands.sh
srun for job stepsYou can use srun to split up your computations in various ways. If you
have used the GNU “parallel” command, srun can achieve the same thing.
Here’s some common patterns to solve various problems.
We already saw how to run multiple copies of a command in parallel:
#SBATCH --ntasks=8
srun myprog
This will run 8 separate copies of myprog on the 8 tasks that we asked
for. When you run srun as a job step, it will get all the resources of
the job, then uses those resources to run the command, once per task.
Run MPI Programs
When we run MPI programs, we are doing exactly the same thing: We run a
job step with one instance of the MPI program per task. Slurm sets up
the environment so that MPI programs are launched properly. If we want
to run, say, “pi_mpi” in an sbatch script, we can do:
#SBATCH -n 8
srun pi_mpi
pi_mpi will start as an MPI program without any special effort on our
part. We do teach that you should use the “–mpi” option to srun:
#SBATCH -n 8
srun --mpi=pmix pi_mpi
This is actually optional. It is the preferred way to run really large MPI programs, but in most cases it is not necessary.
Resource allocation
You can limit the amount of resources each task gets to use with srun
options:
#SBATCH --ntasks=8
#SBATCH --cpus-per-task=4

srun -c 2 myprog
We ask for 8 tasks, and each task has four cores. The job step controls all the
cores (and memory) we allocated for the job, but we use the “-c 2” option to
restrict each task to use only two of the four cores it would otherwise have
had. That is, gets all 4 cores allocated, but we tell it to only use 2 of them.
This means that while you are only using 2 cores per task, the other two cores are still allocated to the task, and will sit idle. No other task can use them.
If you want to also restrict the resources that the job step is
allocated, add the “--exact” option. It will restrict the resources to
only the specific amount that the srun command asks for. We use this
below for running separate commands in each task.

We can see this in the illustration above: We have two tasks with four
cores each. At the top, each process get allocated (red) and uses
(yellow) four cores. In the center, each process only uses 2 cores, but
the remaining two cores are still allocated to it and going to waste.
At the bottom, the --exact parameter releases the unused 2 cores for
other job steps to use. The same idea holds for memory allocation.
As we saw in the section above, srun will normally be granted all the
job resources and run a command in every available task.
If you want to run multiple instances of a single application with
different inputs, you can run a shell subcommand as we described
above, then use SLURM_PROCID to decide what to do in each instance,
much like we use SLURM_ARRAY_TASK_ID for array jobs:
#SBATCH --ntasks=8

# SLURM_PROCID counts up from 0-7
srun bash -c 'myprog input_${SLURM_PROCID}.data'
This would run “myprog input_0.data”, “myprog input_1.data” and so
on, much like an array job.
Using SLURM_PROCID as above works if you’re running the same command
in each task. If you want to run different commands, you need to start
each of them manually. And in that case there are a few things you need
to consider.
As we said above, srun gets allocated all the available resources by
default, and will try to use all resources to run its command. If you
want to run multiple instances, you need to explicitly tell srun what
resources it should use, and use the “--exact” option to tell Slurm
not to give each srun instance more than it asks for:
#SBATCH --ntasks=2
#SBATCH --mem=16G

# specify resources, and that Slurm not allocate anything more
# "--mem=0" means, use and share the memory with the other tasks.
srun -n 1 --mem=0 --exact myprog1 &
srun -n 1 --mem=0 --exact myprog2 &

# we need to wait for all srun tasks to finish
wait
We use srun to run two programs “myprog1” and “myprog2”. Each line
ends with “&”; that runs the srun command as a background process, so we
can continue to the next line before the first one is done.
Each srun line has to specify that it uses only one task (“-n 1”)
each, or they would both try to run 2 tasks. What would happen is that
the second line with “myprog2” would wait until the first command is
done.
We specify a memory amount of 0 (“--mem=0”). For job steps this means
you can use all the available memory for the job, but it will be freely
shared between steps. You could also specify, say, 8GB per process, but
making it shared is easier and more flexible.
”--exact” tells slurm to only give the job step the resources it asks
for, and no more. Without it, the first step would still get all the
resources, leaving the second to wait. You sometime see people use
“--exclusive” instead; in this case they do the same thing.
“wait” is a shell command that waits for all running subprocesses
before continuing. Since both “srun” commands run in the background, the
shell would otherwise exit immediately, and the job steps would get
killed before they’re done.
At times you may want to run a command exactly once per node. For
instance, each node has some local storage (in /scratch) and you might
want to store data there, or you may want to delete temporary data put
there by an earlier job.
Use the “--ntasks-per-node” option to srun to tell slurm to run your
job step only once per node:
srun --ntasks-per-node 1 <command>
Note: this method does not always work with all versions
of Slurm. If you get a message
“Warning: can't honor --ntasks-per-node=1” you can run one task per
node in this way instead:
srun --ntasks=${SLURM_NNODES} --distribution=cyclic <command>
This tells Slurm to run as many tasks as there are nodes; and to distribute each one on a different node in turn, rather than put them all on a single node. Not as elegant, but the end result is the same.
salloc, srun and interactive jobsAs we saw above, sbatch first allocates resources, then runs the
sbatch script as the first task in that job allocation. From that
script, you can start further job steps with srun.
But what happens when you run an interactive job with srun directly?
Srun has to somehow create an allocation, then start a job step in it.
As it turns out, when you start an interactive job, you’re really
using two commands, one after another:
# this command to run an interactive job:
$ srun -p compute -t 0-1 -c 4 --mem=16G my_program

# is the same as the following two commands:

# first allocate resouces, get a node
$ salloc -p compute -t 0-1 -c 4 --mem=16G

# use the allocated resources for a job step
$ srun my_program
The salloc command allocates resources in the same way as sbatch,
then srun makes use of them. For convenience, the srun program will do
both the allocation and job step creation in one go when you want to run
an interactive job.
But you can use salloc directly if you want, and sometimes it’s a
really good idea.
# We're on a login node, and ask for an allocation
jan-moren@deigo-login3:
~$ salloc -n 4 -c 1 --mem=16G -p compute -t 0-1
salloc: Granted job allocation 25199827
salloc: Waiting for resource configuration
salloc: Nodes deigo011224 are ready for job

# Now we're on a compute node, with the above allocation
# We can, for instance, start an MPI job on the
# four tasks we asked for with salloc:
jan-moren@deigo011224: (14:33)
~$ srun my_mpi_job
Above, we allocate four tasks and 16G memory for one hour using
salloc. When the allocation is granted we get a shell on the first
allocated node. This is the same kind of state as the slurm script in a
batch job. You’re using the first task and its allocated cores and
memory on the first node of your allocation.
This can be very useful when you’re writing and debugging scripts, especially if they use complicated job steps. You can run each step here interactively, perhaps replacing your real computation with placeholder command, and see if it does what you think it does. All the examples above have been tested in this way.